Sunday, November 6, 2016

French Style Braised Lentils


Fabulous fall! Though I wait impatiently all year for the first taste of spring berries, it is fall flavors that have my heart.

Yes, I am a big fan of pumpkin and all shapes and sizes of winter squash, but fall is much more than just a pumpkin spice latte! Fall is full of savory apples and sage, thyme and filling dishes like creamy mashed potatoes and French style braised lentils. All amazing flavors that I am excited to share with you this month.

Fall also seems like a great time to finish my time with The Secret Recipe Club. It has been an amazing ride and I have highlighted some amazing dishes here on Adventures in All Things Food. I have been honored to also have my dishes featured on various blogs over the years. There is something exciting about seeing my family's favorite dishes come to life on other food blogs.

For my final Secret Recipe Club feature I was honored to be assigned to cook from Lavendar and Lovage, where Karen shares some amazing dishes and recipes. She divides her time between North Yorkshire and SW France, and her food reflects that.


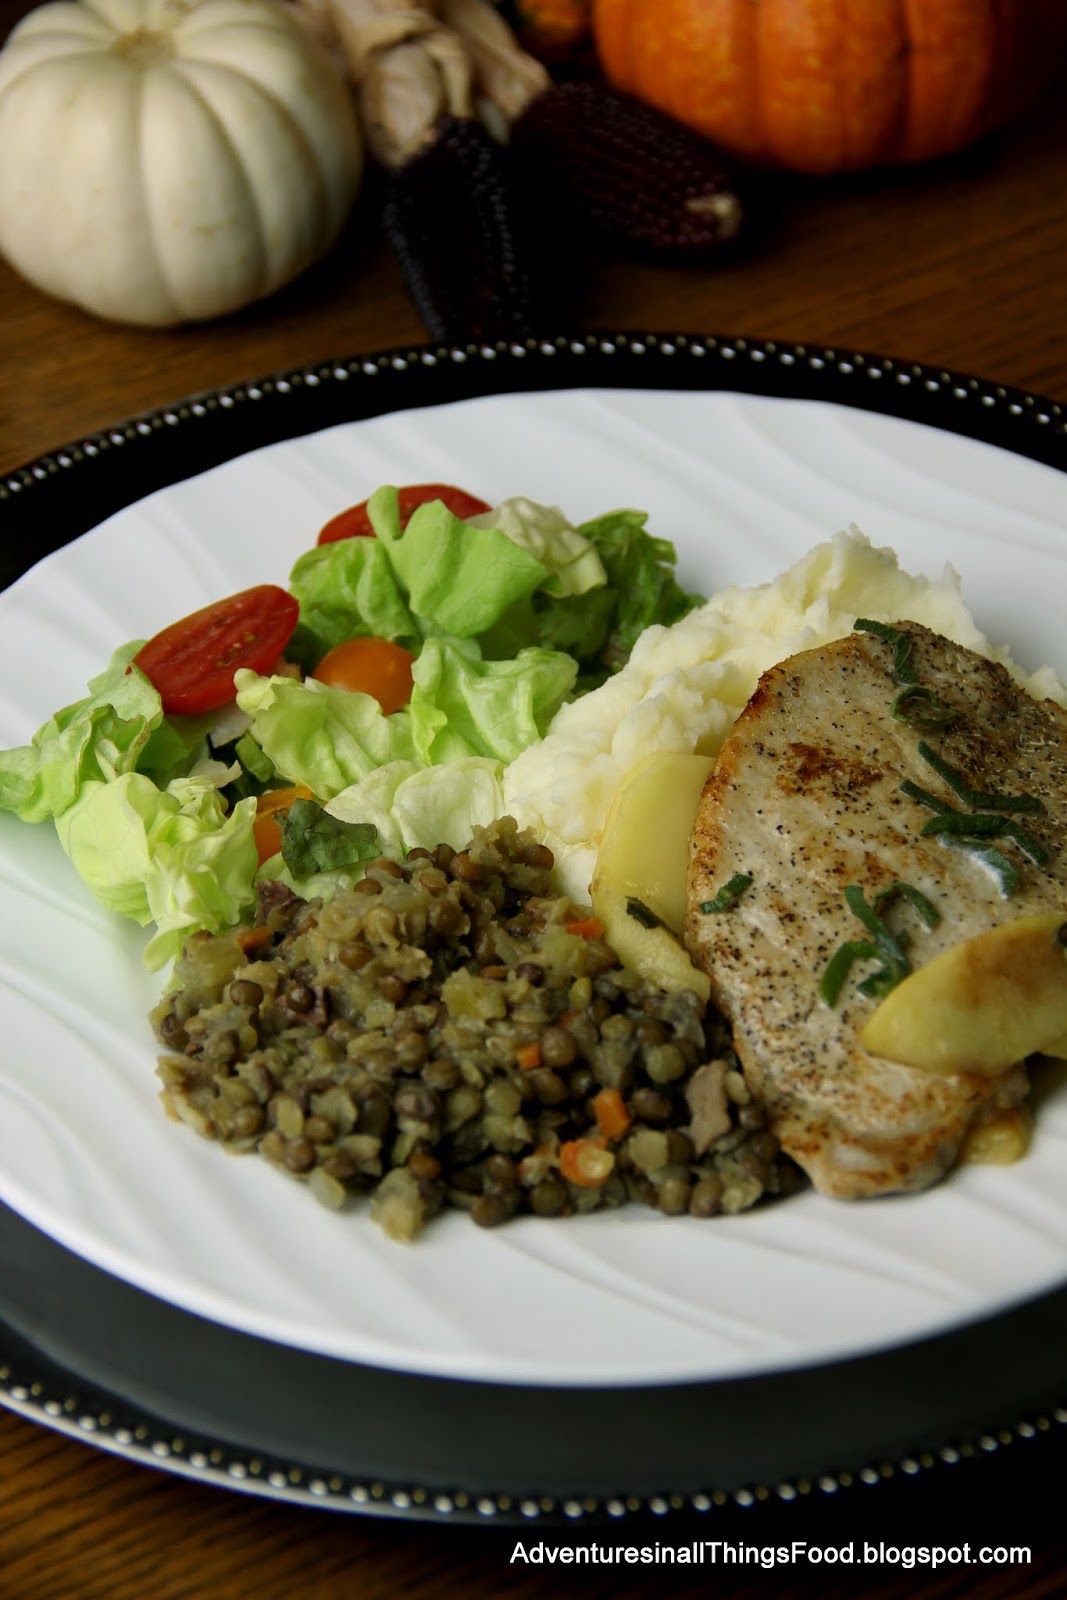
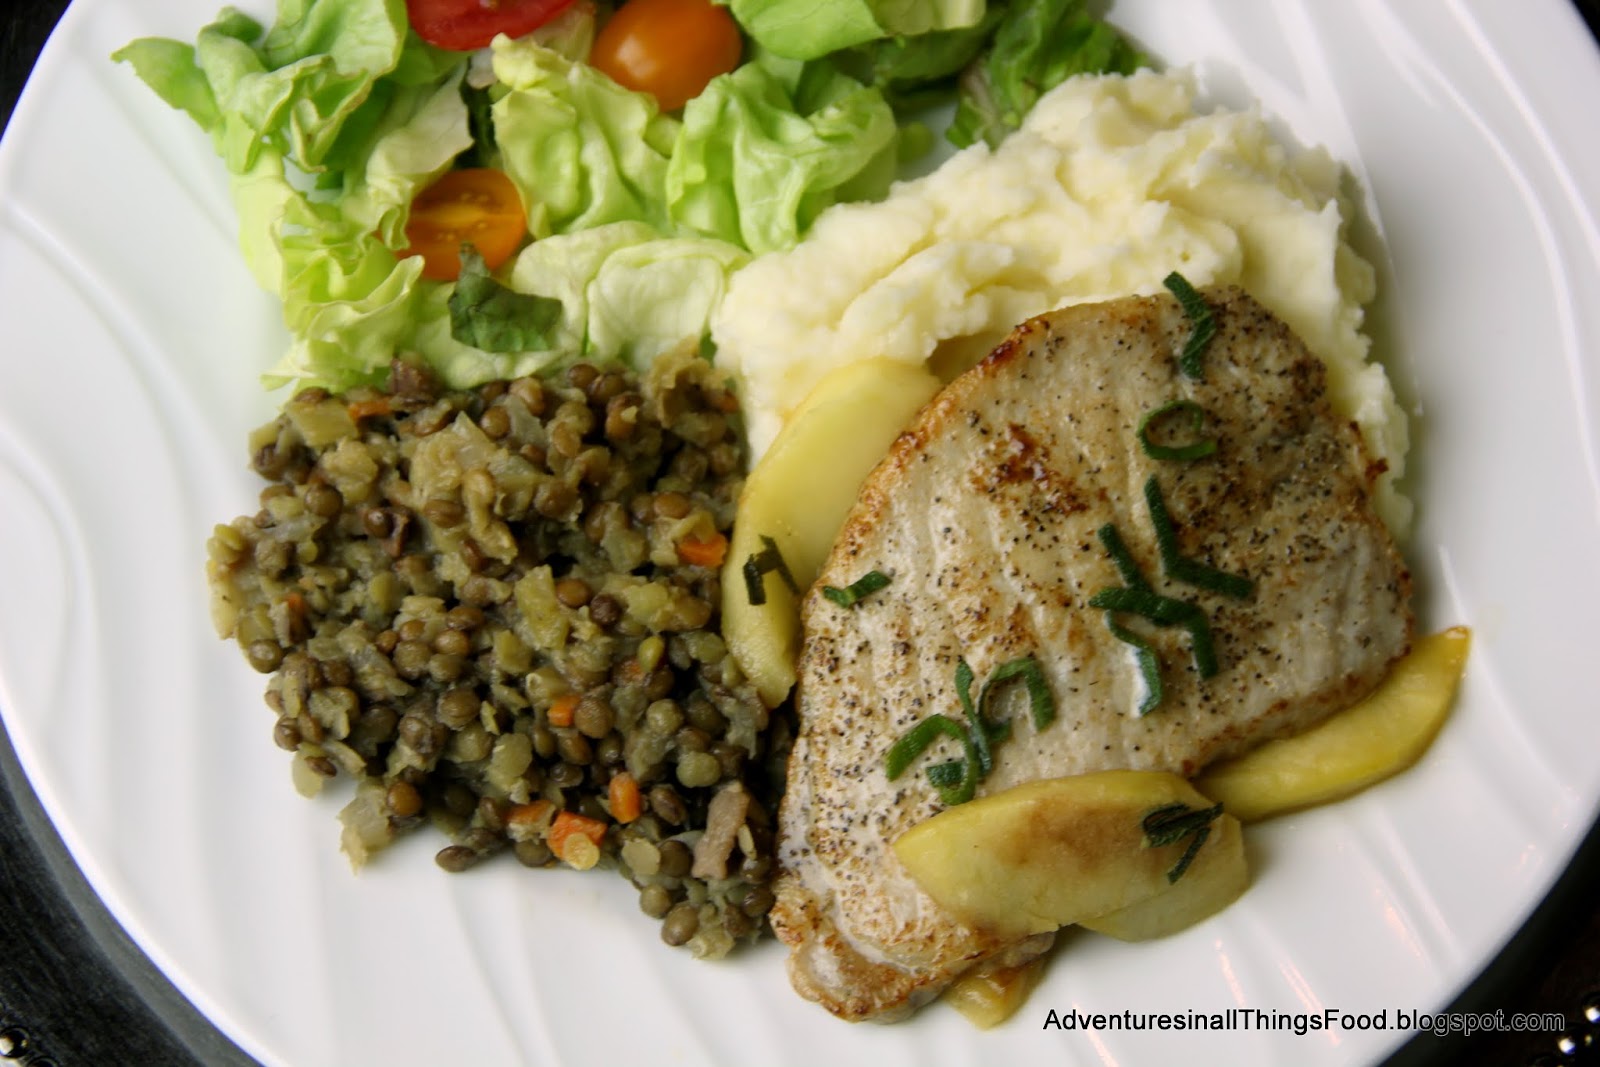
I have to admit that I love lentils. I have only two recipes in my repertoire that use lentils and was thrilled to find a hearty and easy dish with lentils on Karen's blog. Her French Style Braised Lentils sounded like the perfect fall dish to share with my family on Sunday. Paired with pan seared pork and apples, mashed potatoes and a little salad, it had everyone falling in love with these fall flavors.


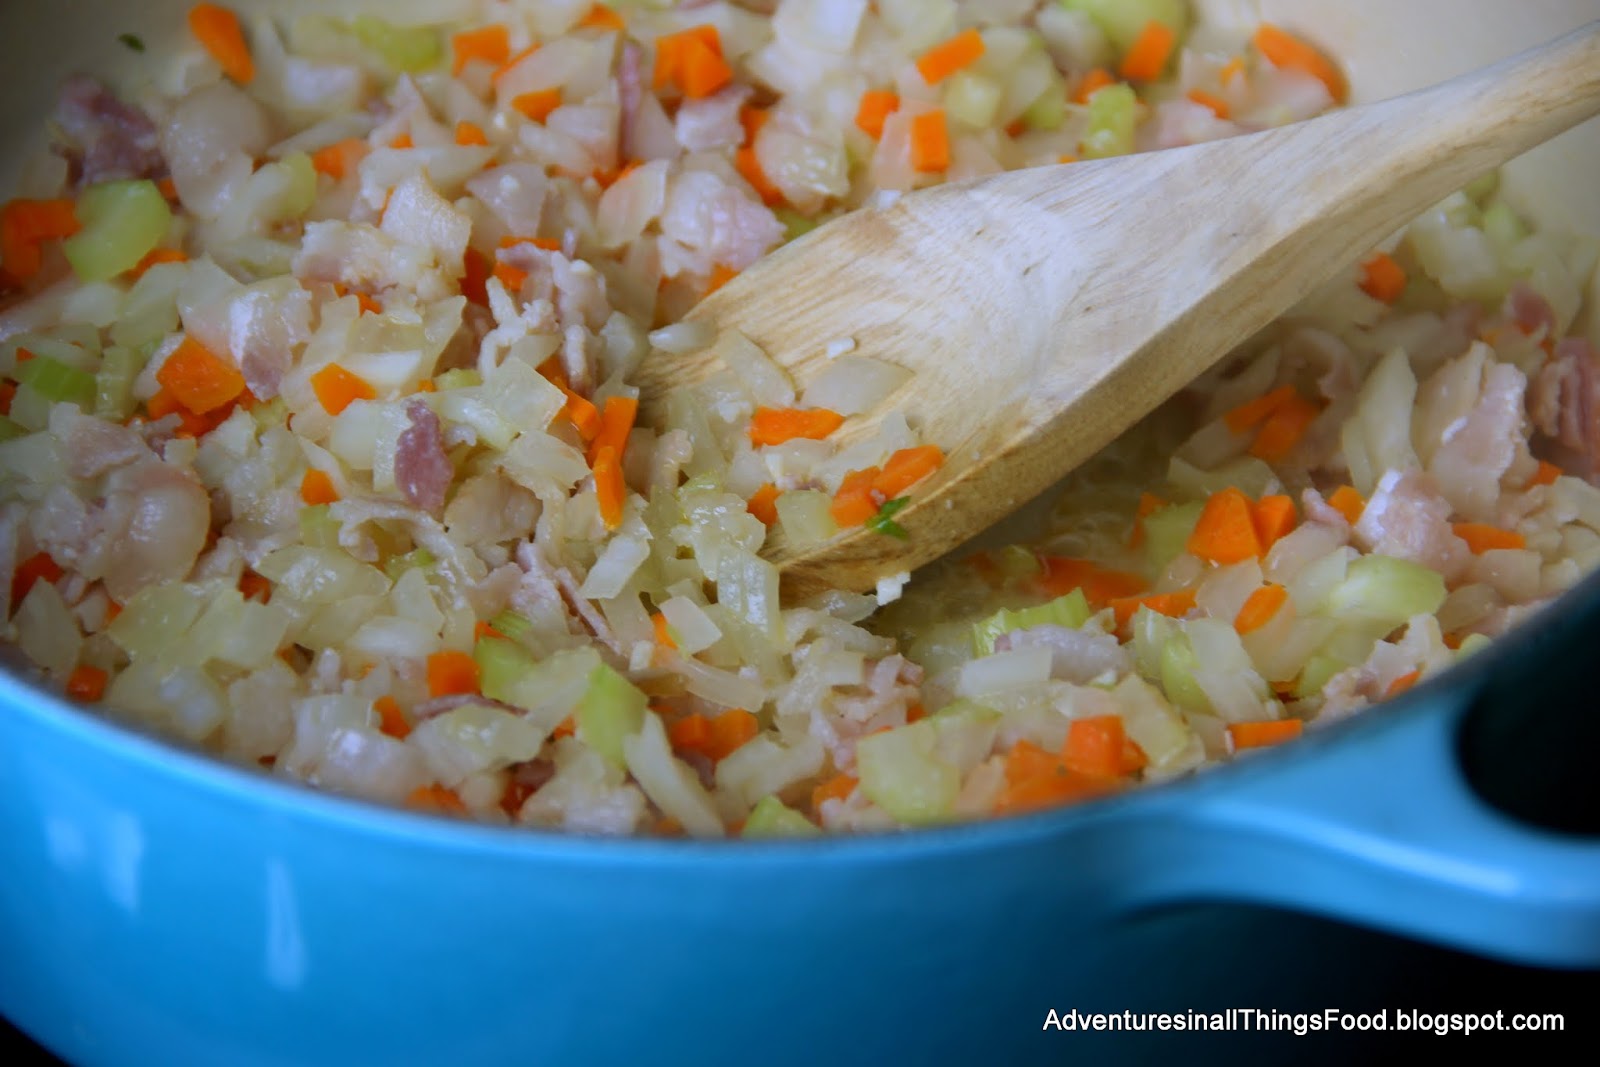
This recipe is very simple and makes a lot of lentils. I made up a full batch for the family and was thrilled to have leftovers for several lunches. The dish begins with a simple saute of the vegetables and bacon. Then the remaining ingredients and lentils are added to simmer for 30 minutes.

This dish proves once again why dijon mustard and apple cider vinegar are staples in my pantry. The combination is amazing!

Once this dish is started, simmering leaves plenty of time to make the rest of the meal.


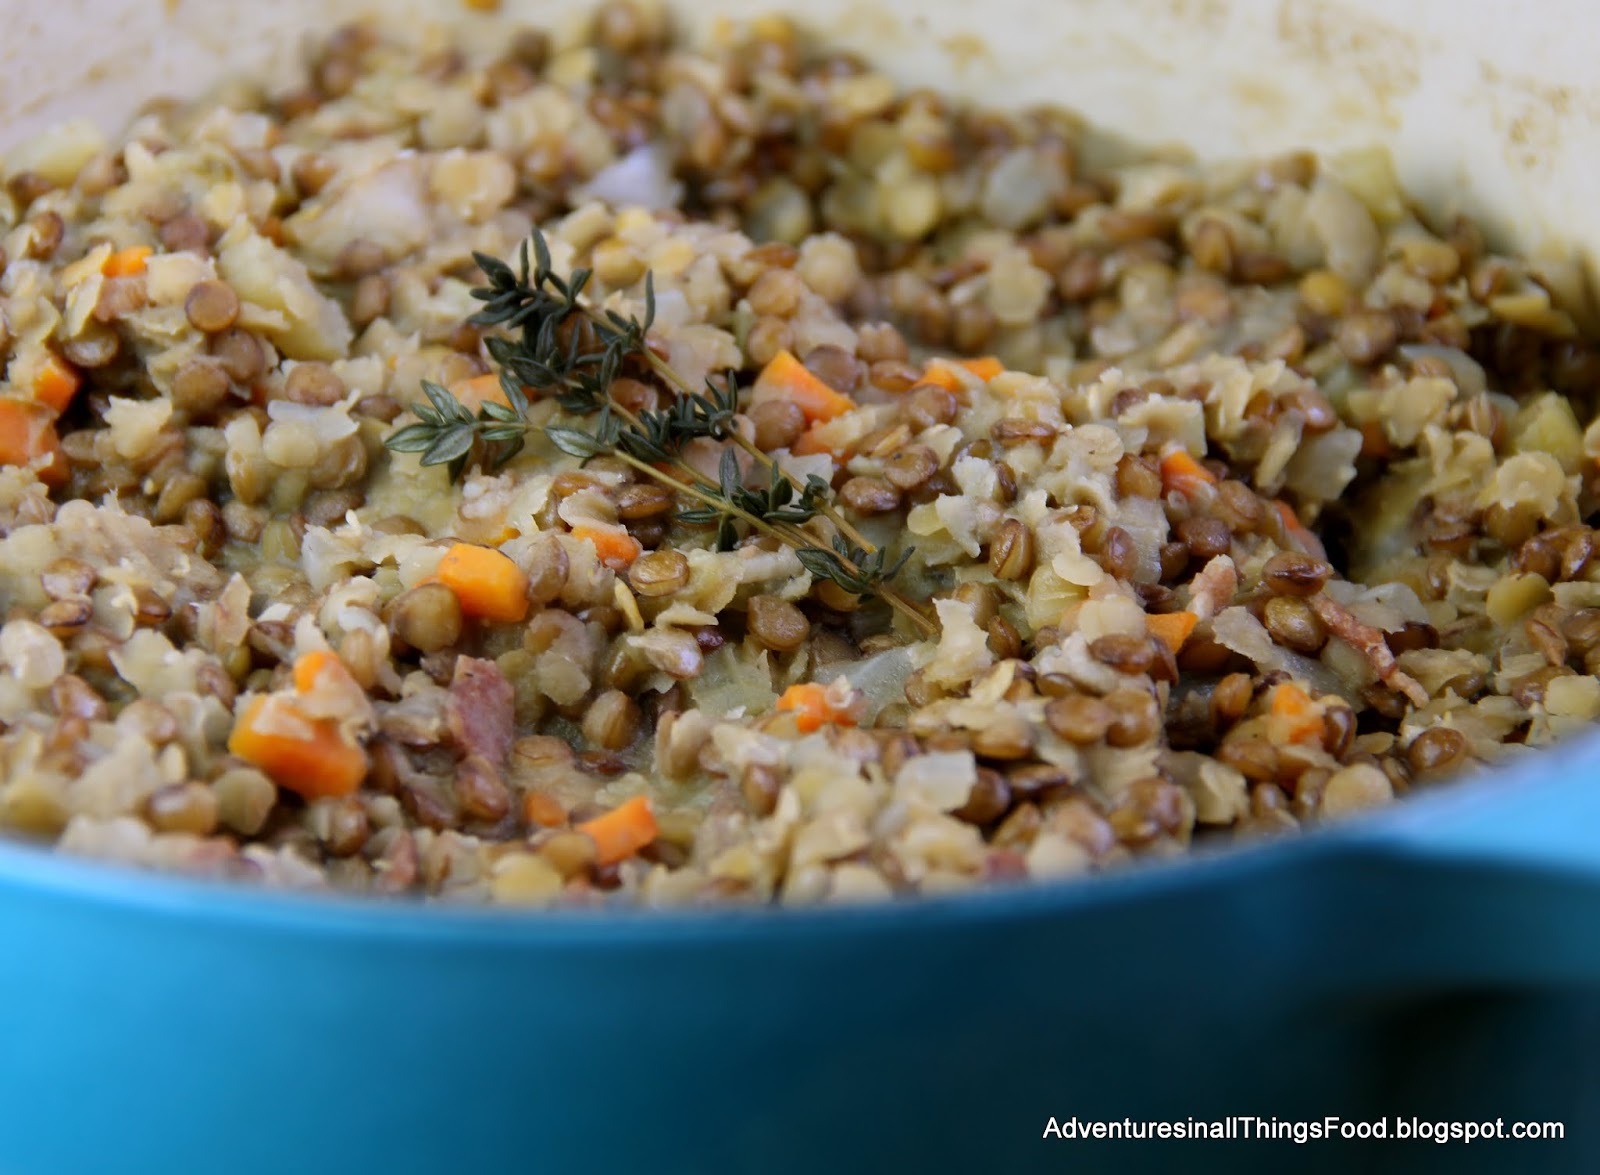
I opted for a mixture of green and red lentils. Though, the red lentils didn't come out as colorful as I had hoped. They had looked so pretty on the shelf at Trader Joe's. I just couldn't resist!


French Style Braised Lentils
recipe from Lavendar and Lovage

You Will Need:

  • 1 tablespoon butter (or oil of your choice)
  • 1 carrot, peeled and diced
  • 1 celery stalk, diced
  • 1 onion, diced
  • 2 cloves garlic, diced
  • 3 slices of bacon, chopped
  • 2 c. lentils
  • sprig of fresh thyme
  • 1Tbsp. apple cider vinegar
  • 2 tsp. Dijon mustard
  • 4 c. water
  • salt and pepper to taste
Heat the butter in a dutch oven and add the carrots, celery, onion, garlic and bacon. Saute over medium heat for about 10 minutes. They should be softened and the onions should be translucent.

Add the lentils to the pan and stir to coat, then add the remaining ingredients. Stir to mix and then cover and simmer gently for 25 to 30 minutes. The lentils should be tender.

Season to taste and serve immediately, or keep warm to serve with the main course. This dish reheats very well and can also be made ahead of time.

Enjoy!

A fond farewell to all my friends in The Secret Recipe Club! So many amazing memories and delicious dishes have been shared. Thank you all!


Andrea
Pin It

Sunday, October 2, 2016

Southwestern Breakfast Scramble - Brunch is Served!


September passed like a whirlwind...


We started the month with a new school year and I can hardly believe that my oldest two are in 2nd and 3rd grade already. New teachers, new lessons and the end of lazy summer days outside. Our days  quickly filled with alarms and new school schedules. It didn't leave a lot of time for kitchen creativity.

Some nights I hit the pillow and feel grateful that we all made it through another day. Everyone was fed, but between work and keeping up with the kids' requests, it didn't leave much time or energy. Ever feel like that?


Not to mention my youngest is deep in potty training... and following in his Mommy's footsteps. Future food blogger. maybe? Currently he prefers video, but we can work with that! Which leads me to today's recipe share.

Being a busy Mom, ready to face fall, school carnivals and empty stomachs, I was excited to find Sarah's recipe for this Southwestern Breakfast Scramble as my October Secret Recipe Club blog assignment.

If you haven't seen Sarah's blog, Things I Make (For Dinner), you have to check it out! I have had the pleasure to blog with Sarah in the #BookClubCookbookCC group as we read and cooked our way through a year of deliciously inspired dishes. Sarah loves to cook and you will find a whole variety of delicious recipes on her blog for everything from Cherry Pecan Bread to Tandoori-style Chicken Burgers.

With the fall weather finally hitting Oregon, I was really excited to see all of Sarah's yummy comfort food recipes, like her Parmesan-crusted Stuffed Chicken. Yum!


But, I finally selected her hearty Southwestern  Breakfast Scramble. It was the perfect brunch option for a drizzly weekend. It was also simple, and tasted amazing!

I love any chance I can use up eggs... yes, I may have too many hens at the moment! There were a few late chicks from my broody hens. Hard as I tried to dissuade them from laying, they still managed to add a few young hens to the flock. This was also a great chance to use our farm's fresh salsa. Sorry, my husband and kids all prefer mild salsa. I think this dish was delicious with mild, but would be amazing with a little kick... or a few stray jalapenos. Just saying...


Do here is the cast of characters. I bet you have most, if not all, of these items in your fridge and pantry already.

And yes, on the left... those are tortilla chips. Just trust me.


Start by whisking the eggs and milk.

Yup, whip it good...


Then when the eggs are almost set, pile on the black beans, chips, salsa and cheese. Top them off with a lid and let them get all melty and cozy.


Before serving garnish with the green onions and a little more cheese.

We served three and still had leftovers for the next day. As Sarah mentioned in her post, they re-heat beautifully the next day so don't skimp.

This was a great hearty meal. The chips soften up in the eggs and salsa, so it is more like a breakfast casserole with some occasional crunch. So good. I will definitely be making this more over the cold months.

Ready for the recipe?


Southwestern Breakfast Scramble
from Things I Make (For Dinner)

You will need:

  • 6 eggs
  • 6 Tbsp. milk
  • 2 Tbsp. butter
  • 1 can black beans, drained and rinsed
  • 3 c. tortilla chips
  • 1 c. salsa
  • 1 c shredded cheese
  • 4 green onions, sliced

Whisk together the eggs and milk in a medium bowl.

In a large frying pan, melt the butter over medium heat. When the pan is heated, add the eggs and with a spatula, pull the eggs towards the center of the pan as they cook.

When the eggs are 3/4 set, add the drained beans, chips, salsa and cheese to the top. Cover the pan and let the eggs cook for an additional 5 minutes.

Serve immediately garnished with sliced green onion and additional cheese, if desired.

Enjoy!


Andrea
Pin It

Sunday, September 4, 2016

Soft Pretzel Bites - Perfect for Back to School!


Snacks.... I never thought about snacks as much as I have since becoming a Mom. I keep snacks on hand, I don't dare leave the house without something handy and my kids are constantly asking for them.

"Mom, I'm hungry... can I have a snack?"

School is starting back up here next week which brings a whole new angle to snack time - class snacks. Families are assigned one day a month to provide a snack for the entire class. Of course, once on a time snack schedule, my kids are "starving" at that time on weekends, holidays and when out for summer.

So, yes... my life revolves around having snacks handy or a few bars or pouches of something buried deep in my purse. Despite my initial resistance to snacking between meals, I have resigned myself to knowing as my boys get older this need to constantly graze will only get worse.

Lucky for you, my September Secret Recipe Club assignment brought with it a great recipe and snack idea that even the pickiest eaters will enjoy - Soft Pretzel Bites. Now, that is a snack even I was excited to make!

This month I was assigned to Making Memories with your Kids and Erin had tons of great ideas to make meal times fun both for eating and for getting into the kitchen with the whole family. I chose the Soft Prezel Bites recipe for my youngest son, Elliott, who just adores pretzels! He also lives for snacks. While looking through Erin's site though I found many other fun recipes I want to try like her Homemade Pop Tarts or her recipe for Twix Cheesecake Brownie Torte - Yes, please!  Erin really has a passion for getting her kids involved in baking and cooking, so if you are looking to be inspired, be sure to check out her blog.


This recipe is pretty simple. Pretzels and bagels are created like any other bread dough, then boiled briefly and finished off with a topping and some time in the oven to bake and crisp up. The extra step though is totally worth the time! These little pretzel bites are crunchy on the outside while still being warm and chewy in the middle. I dipped mine in some coarse grained mustard, but my toddler gobbled them up plain and warm from the oven.

It all starts with a little yeast...


Proofing is like a morning call to the yeast colony. "Hey guys! Time for work..."


All the ingredients go in and the dough should come out supple, but not too sticky either. It had just enough flour in order to clean the sides of the stand mixer, but it was not dry.


After a good rise, about an hour to double in size, I created my "snake" of dough and used my bench scraper to cut small peices off. I rolled each into a tighter ball and pinched the seam on the bottom.


Then I boiled my pretzel bites in water with non-diastic malt powder for about a minutes. The non-diastic malt powder helps to produce a shiny crust on bagels and pretzels. I use a ratio of 2 Tablespoons to 2 quarts of water. You can order it from amazon or King Arthur Flour. You can substitue baking soda, if you prefer, as in Erin's original recipe.


Then I brushed each bite with egg wash and sprinkled it with a little pretzel salt. The pretzel salt really holds up well to baking and doesn't disappear as Kosher salt can.

After baking, the soft pretzel bites were golden brown and ready to be devoured! Don't these look yummy?

Don't worry if the recipe seems to make an endless supply of these little soft pretzel bites. Believe me, they go quickly! Once you start snacking on them, you will be hooked. Let me know in the comments below what you would dip your pretzel bites into? Cheese sauce? Mustard, like me? Or do you have an alternate favorite? I would love to hear about it!


Soft Pretzel Bites
adapted from Making Memories with Your Kids

You Will Need:
  • 1 1/2 c.  water at room temperature
  • 2 Tbsp. brown sugar
  • 2 1/4 tsp. active dry yeast
  • 6 Tbsp. unsalted butter, melted and cooled
  • 2 1/2 tsp. bread salt
  • 4 1/2 c. flour
  • vegetable oil - for oiling the bowl during proofing
  • 2 quarts water
  • 2 Tbsp. non-diastic malt powder
  • 1 egg beaten with 1 Tbsp. water
  • pretzel salt
Proof the yeast by combining the water, yeast, brown sugar and butter in the bowl of a stand mixer. Let stand for 5 minutes, or until the mixture foams and becomes bubbly. If there is no activity, or your yeast is sluggish, replace the yeast and start again.

Add the salt and flour to the bowl and with the dough hook, mix on medium for about 5 minutes. The dough should become smooth and the bowl should be clean. Remove from the mixer and put into an oiled bowl, turn the dough over, cover the bowl and let the dough rise for about an hour, or until the dough has doubled in size.

Once the dough is almost ready, bring a pot of water up to boil with 2 quarts water and the non-diastic malt powder. Preheat the oven to 425 degrees.

Once the dough is ready, divide into 8 balls. Roll the dough out into long snakes and cut or divide into smaller portions. They will still puff up a little while cooking. I cut mine into thumb sized peices. 

Working in batches, drop the pretzel peices into the boiling water for about 30 seconds, then with a slotted spoon, remove them and place them on a non-stick baking mat. I used silpat for this this. Brush the boiled dough with egg wash and sprinkle with pretzel salt. Bake for 10 to 15 minutes, or until the peices are a golden brown.

Remove from the oven and transfer them to a cooling rack.

Enjoy! 


Andrea
Pin It

Sunday, July 31, 2016

Sauteed Zucchini with Sun-Dried Tomatoes and Basil


As July changes into August, it marks one of my favorite times of the year. There is such a bounty of local fruit and vegetables available that it makes evening meals so much easier!

Instead of traditional meal planning with lists and recipes, I usually just throw together what is ripe and ready on our farm. We have corn, cantaloupe, broccoli, peaches, etc. We also have just the start of tomatoes and lots of basil. And of course, there is the never-ending supply of zucchini - yellow and green, as well as summer squash.

So, while looking through Sally's fabulous blog, Bewitching Kitchen, for my August Secret Recipe Club assignment, I had an eye on tempting recipes with seasonal ingredients. Of course, Sally has so many amazing recipes, it would be hard not to find something to fit the season!

Sally was born in Brazil and so I was tempted by her list of Brazillian dishes like Shrimp Moqueca and Baked Coconut. Both of those I want to go back and try soon!

Sally also has an Ultimate Apple Cake recipe that I just had to try. ... and I have made it twice already it was such a smashing success. I was intrigued when Sally posted that the cake was not only fool-proof but contained so many diced apples, you might be skeptical that the cake would really turn out. This was not my first apple cake try, but it was my family's favorite by far!  Yes, since I was talking about seasonal fruits, we do have early apples now. Crazy, right?


But, that is not the recipe I ultimately decided to share here. I finally settled on Sally's Sauteed Zucchini With Sundried Tomatoes and Basil.


This just summed up summer flavors perfectly for me right now. It was also something my whole family could enjoy. I did make Sally's original recipe, but my only addition was a few grape and cherry tomatoes that we found in the field behind out house. I love sundried tomatoes, but my kids prefer the fresh tomatoes more. Either way you make it, I am sure you will enjoy this simple side.  !


Start with medium sized zucchini, washed and quartered so they are all about the same size. Smaller zucchini will have smaller and more tender seeds.  Pat them dry and then salt lightly to help draw out even more moisture.

No one enjoys a limp or soggy squash! Just 10 minutes will help with that.


Just blot them dry and saute with a little olive oil and garlic till they have some color and are fork tender. Then toss with the tomatoes, basil, and some fresh lemon juice. Season and enjoy!

This would also be a fun dish to make outdoors on the grill if it is too hot indoors for cooking. Either way, I hope you give this fun side a try and head over to see all the tempting recipes on Sally's blog, Bewitching Kitchen!


SAUTEED ZUCCHINI WITH SUN-DRIED TOMATOES AND BASIL

adapted from Bewitching Kitchen

You will need:

  • 2 medium zucchini
  • 1/2 tsp. Kosher salt
  • 2 Tbsp. virgin olive oil
  • 1/2 tsp. minced garlic
  • 3 sundried tomatoes, drained and diced
  • 6 basil leaves, sliced in thin strips *or fresh grape or cherry tomatoes halved
  • 1/2 lemon juiced
  • salt and pepper to taste
Rinse and quarter the zucchini lengthwise. Pat dry, and arrange on a single layer on a baking sheet lined with paper towels. Lightly salt the squash and allow to sit for about 10 minutes. Blot any excess moisture and make sure the zucchini are roughly the same size.

In a large skillet, heat the oil over medium-high heat. Add the zucchini and garlic. Saute till fork tender and starting to brown. Remove from the heat and toss with tomatoes, basil, and lemon juice. Season to taste and serve immediately.

Enjoy! 


Andrea
Pin It

Thursday, July 21, 2016

Peaches and Cream Crepes

Sweet and creamy mascarpone topped with fresh, ripe peaches, wrapped in a warm crepe and dusted with powder sugar to create these Peaches and Cream Crepes.


This summer everything has come early on the farm. It has been a pretty crazy spring and summer season. We had strawberries in May, Cherries followed shortly after and now... peaches. All came earlier than usual.

Even dinner seems to come earlier than expected each night and I am often left scrambling to make something my whole family will enjoy.


This month I am embarking on a new adventure with the Improv Cooking Challenge. They challenged us all to come up with a "Peaches and Cream" recipe, and this one definitely won me over. I really wanted to keep things simple and let those luscious peaches take center stage. The mascarpone was just an added bonus!

If you feel up to a challenge, you can join in on the fun. The Improv Cooking Challenge posts the 3rd Thursday of each month.


Peaches will probably always be a mystery to me... my husband tends the orchard and I wait impatiently for him to tell me they are finally ripe. But, when to pick the perfect peach with just a little time to finish ripening on the counter is tough! I am too impatient. I would rather eat them straight from the tree. Instead, I wait every year for my husband to bring home the first peaches... and I watch them carefully till they are just tender enough to slice.

Peaches always make me think of that scene in the Japanese movie Tampopo where the crazy old woman is squeezing and bruising the peaches, bread, or really anything she can get her hands on. Too bad she didn't know about Charmin, right? She may have been a little overzealous, but  how do you pick the perfect peach... how do you find one that isn't too mushy or bruised, but right at the peak of ripeness?

To to be perfectly honest, once I have a ripe peach I usually just slice and eat it on the spot. No recipe necessary.

This challenge was a great way to break out of my peach rut though. I know I will be making these crepes a few more times before our peaches are done for the year. They still allow me to enjoy the perfection of a ripe peach, without too much fuss and bother.


Making crepes is a skill I would love to master. I consider myself to be pretty good, but I want to keep practicing. Practice, practice, practice... eating all the way! Crepes really are much easier than you might think. I still need to get myself a spreader for even batter distribution.

I have a great basic crepe recipe, my go to recipe, I posted a few years back and I still haven't found one to top it. Just omit the sugar and add herbs if you want a great savory crepe. But that recipe is what I used here for our crepes. I always have a few left over and freeze them for future crepe needs.

So, ready to assemble your own Peaches and Cream Crepe?


Peaches and Cream Crepes

You will need:

  • Crepes - frozen or freshly made are fine. This is my favorite recipe.
  • 4 peaches, thinly sliced
  • 1 Tbsp. fresh lemon juice
  • 1/2 c. mascarpone cheese 
  • 3 Tbsp. heavy cream, or more to achieve spreading consistency
  • 1 Tbsp. sugar
  • Confectioners sugar, for dusting
Sprinkle lemon juice on peaches to prevent browning.

Whip together the mascarpone cheese with heavy cream  and sugar till the mixture is light and spreadable.

Spread a layer in the middle of a crepe and top with slices of peach. Fold over and dust generously with powdered sugar before serving.

*Note - the crepes can be made ahead of time and frozen between sheets of wax paper. Thaw to room temperature and heat briefly in a pan to make them more pliable. This makes the dish even more weeknight friendly! 

Enjoy! 


Andrea
Pin It

Tuesday, July 19, 2016

Galaktoboureko - Greek Custard Pie #‎thebookclubcookbookCC


For July we dove right into Corelli's Mandolin by Louis De Bernieres for The Book Club Cook Book Cooking Challenge. Sadly, this is our final post for the group as we posted a year's worth of great reads and great food finds. This month was once again hosted by Camilla from Culinary Adventures with Camilla.

Looking back, it has been an impressive list of book and some great recipes. Many of the things I read and created for this group, I might not have tried otherwise. For that I am grateful!


I was excited this month because the book was, again, one I hadn't read. I actually haven't seen the movie either... But, it also was set in the Greek island of Cephallonia. I love Greek cuisine and knew I wanted to try something I hadn't made or tried previously.

The book itself took me a while to warm up to. It is interesting, yes, surprising as well as humorous at times. The tale of the doctor removing a green petrified pea from a patient's ear was memorable. But what I loved the most was the writing and the setting.

From all that, I was excited to make something I hadn't tried before. I have made Spanakopita before, and it is a dish a love, but I wanted to try something to uniquely tie to the story. A dish and flavors that I didn't have previous memories attached to. I ended up Googling Cephallonia and Greek cuisine and found myself with Galaktoboureko. Someone on vacation mentioned having it one night for dessert.

And if you know me. you know I am always looking to use up some eggs. A custard sounded perfect!


This is actually the first custard I have ever attempted that was thickened with fine semolina flour. I plan to use the rest of this bag to create some amazing pasta.


The only other ingredient I don't work with often is phyllo dough. Nothing mysterious about it. I purchased mine frozen. You will want to thaw it in the refrigerator the day before assembling your dessert.

Other than these ingredients, it was a pretty simple dessert. I was able to make and bake it during nap time and surprise my family with something new.


So for our final month of books and recipes, I suggest you sit down with a copy of Corelli's Mandolin and savor a slice of this creamy Galaktoboureko.

Ready for the recipe?


Galaktoboureko - Greek Custard Pie
recipe adapted from It's All Greek To Me by Debbie Matenopoulos

You will need:

  • 6 cups whole milk
  • 3/4 c. fine semolina flour
  • 1/2 tsp. vanilla extract
  • 6 large eggs
  • 1 c. sugar
  • 2 Tbsp. unsalted butter, at room temperature
  • 1 - 1lb. package of phyllo dough, thawed
  • 1 stick butter, melted
  • 2 1/2 c. sugar
  • 1 1/2 c. water
  • 1 large slice of lemon peel
  • 1 tsp. freshly squeezed lemon juice
  • lemon zest for garnish
 Preheat the oven to 350 degrees. Grease a 9x13" baking dish.

In a large saucepan, bring the milk to a slow simmer. Once starting to bubble, stir in the semolina. Once it begins to thicken, take off the heat and stir in the vanilla. Set aside.

In a medium bowl, whisk the eggs and sugar. Slowly start to temper the eggs by pouring in a little of the hot semolina mixture into the eggs while whisking constantly. Add in 2 cups slowly, then pour the egg mixture into the saucepan. Keep whisking to prevent the egg from scrambling. Whisk in the butter till the mixture is smooth. Pour the whole mixture through a strainer to remove any lumps of semolina or egg.

Unroll the phyllo dough on a counter and cover with a kitchen towl to prevent it from drying out  while you work. Work quickly. Place a single sheet in the baking dish, brush with butter and continue stacking and brushing till you have 9 sheets in the dish. 

Then spread the custard evenly over the phyllo dough, then continue layering the phyllo dough and brushing with butter until all the sheets are used. Trim overhanging edges and brush the top with extra butter.

Before baking, score the top few layers into 16 or more equal pieces. Bake uncovered for 55 to 60 minutes, or until the top is golden and flaky.

While baking, create the lemon syrup. In a medium saucepan, whisk together the 2 1/2 cups of sugar and 1 1/2 cups water. Add in the lemon peel and bring it up to boil. After it has boiled for 5 minutes, remove from the heat and stir in the lemon juice.

Once the squares are removed from the oven, immediately begin spooning the simple syrup over the phyllo dough. Cool for 45 minutes before slicing. Top with lemon zest for decoration.

Enjoy!

___________________________

Here we are at the final #thebookclubcookbookCC event. Final. Can you believe it??

It's hard to fathom that our year-long journey to explore - and cook from - The Book Club Cookbook, Revised Edition: Recipes and Food for Thought from Your Book Club's Favorite Books and Authors by Judy Gelman and Vicki Levy Krupp* is drawing to a close. Judy, Vicki, and their publisher, Tarcher-Penguin, provided the hosting bloggers with copies of the book plus copies to giveaway each month of the project. We are so grateful for their generosity over the past year.

Giveaway
This month Camilla at Culinary Adventures with Camilla, this month's host, is giving away two copies of the book.* Enter to win a copy of the cookbook!

TWO of our lucky readers - US and Canada only! - can enter to win a copy of The Book Club Cookbook, Revised Edition: Recipes and Food for Thought from Your Book Club's Favorite Books and Authors by Judy Gelman and Vicki Levy Krupp, courtesy of Tarcher-PenguinGiveaway runs from July 1st till July 31st at 6 o'clock PM, Pacific time. Please see terms and conditions in the rafflecopter widget below. Many thanks to Tarcher Books. You may find Tarcher: on the web, on Facebook, on Twitter, and on Pinterest.

a Rafflecopter giveaway
*Disclosure: Camilla received a complimentary copy of The Book Club Cookbook, Revised Edition: Recipes and Food for Thought from Your Book Club's Favorite Books and Authors by Judy Gelman and Vicki Levy Krupp as an opportunity to give two copies away. Opinions are our own. We received no further compensation for our posts.


Andrea
Pin It

Sunday, July 3, 2016

Sourdough Rosemary Bread with Olive Oil

This Sourdough Rosemary Bread with Olive Oil was a weekend hit and the perfect loaf to pair with a fresh dinner of sauteed farm veggies and baked chicken.


After a bit of traveling last week, I was really itching to get into the kitchen to bake. This bread recipe definitely didn't disappoint.

I am also having a hard time coming to terms with the fact it is already July. How did July get here so quickly? In preparation for Fourth of July backyard grilling, I wanted to go low-key over the weekend. Instead of our usual big family dinner, I opted for a simpler weekend treat, saving my time and kitchen for the upcoming holiday.

I have a fun grilled dinner planned for Monday, so this weekend I wanted some simple baked chicken, sauteed veggies and a hearty bread. I always know if nothing else suits him, my toddler will always be happy with freshly baked bread.

 The start of July also brings me to this month's Secret Recipe Club reveal. This month it was my honor to be assigned Karen's Kitchen Stories. Karen is a self-proclaimed bread geek, so I knew I had to try one of her breads.. Believe me, there is a long list of amazing looking breads in her recipe index. Bread isn't the only thing Karen is talented at making, I also  found some other amazing looking recipes for General Tso's Chicken  and Baby Yukon Gold Hasselback Potatoes. If you end up making one of Karen's recipes, be sure to let me know in the comments below which one caught your eye!


I always enjoy any excuse to bust out my sourdough starter (originally from King Arthur Flour) and loved that this one also used rosemary. My darling "little" plant has completely taken over one corner of my garden and I currently have more rosemary than I could ever use.

But that is a problem that I rather enjoy having. I do try to use rosemary whenever possible without going completely overboard. This bread is amazing - but not overboard on rosemary flavor. Yum!

The recipe is actually quite simple, but it does take some forethought as there is a lot of inactive time required while the loaves rise. The longest rise takes place overnight in the refrigerator. I just barely escaped a rising disaster due to my bowl size. Luckily, it had just enough room to expand overnight before being shaped and baked.


This recipe is enough for making 2 boules, and they are best baked in cast iron dutch ovens for the best crust and crumb. I only have one Le Creuset dutch oven, so baked the other loaf on black Silpat. It was also good, but do try to use a dutch oven if you have one.

Also, Karen's recipe calls for letting the dough rise in a banneton or brotform. My loaves didn't achieve the same height because I let them rise free-form. Don't worry, I actually have a round banneton ordered and hope to share my experience with it soon. If you don't have these types of forms, don't worry. Do expect your loaf to spread outward more than up.

Ready to sink your teeth into a slice of Sourdough Rosemary Bread with Olive Oil?

Okay. Let's get baking!


Sourdough Rosemary Bread with Olive Oil
from Karen's Kitchen Stories adapted from Amy's Bread, Revised and Updated: Artisan-style breads, sandwiches, pizzas, and more from New York City's favorite bakery

You will need:

  • 2 oz. warm water (105 to 110 degrees F)
  • 1 tsp. active dry yeast
  • 14 oz. sourdough starter (100% hydration)
  • 8 oz. water, room temperature
  • 3 Tbsp. extra virgin olive oil
  • 1/4 c. rosemary, chopped
  • 15.3 oz. all-purpose flour
  • 2.8 oz. whole wheat flour
  • 1 Tbsp. bread salt (try King Arthur Flour's blend) 

In a stand mixer, combine the warm water and yeast. Allow to proof for 5 minutes until it becomes foamy.

To the mixer bowl, add in the starter, 8 ounces water, olive oil, and rosemary. Mix with the paddle attachment.

Switch to the dough hook and add in the remaining ingredients. Knead on medium-low (Kitchen-aid setting 4) for a couple of minutes. The dough should be tacky and soft.

Transfer the dough to an oiled bowl or rising bucket. After an hour, fold the dough over from all 4 sides and place it back into the oiled bowl, seam side down. Refrigerate for 8 - 16 hours.

Remove from the refrigerator and allow it to come to room temperature for about 2 hours.

Split the dough in half. Form two boules and place the dough seam side down on pieces of parchment. Cover and allow to rise for 75 minutes to 2 hours, or until the dough has doubled in size.

While the dough is rising, preheat the oven to 450 degrees. If you are going to cook one or more loaves in dutch ovens, place the dutch ovens in the oven to preheat as well.

Spray the lid lightly with water and place the dough into a preheated dutch oven. Bake with the lid on for 20 minutes. Remove the lid, reduce the heat to 400 degrees and bake for an additional 15 minutes.

Remove the bread from the oven and dutch oven. Cool on a wire rack before slicing.

*If you don't have a dutch oven, you can bake this loaf on a tray. I used black Silpat and sprayed the inside of the oven with water before closing the door. Follow the same temperature and time guidelines as the covered loaf. The loaf will taste the same, but will have a different crust. Both methods are delicious, though.

Enjoy!


Andrea
Pin It